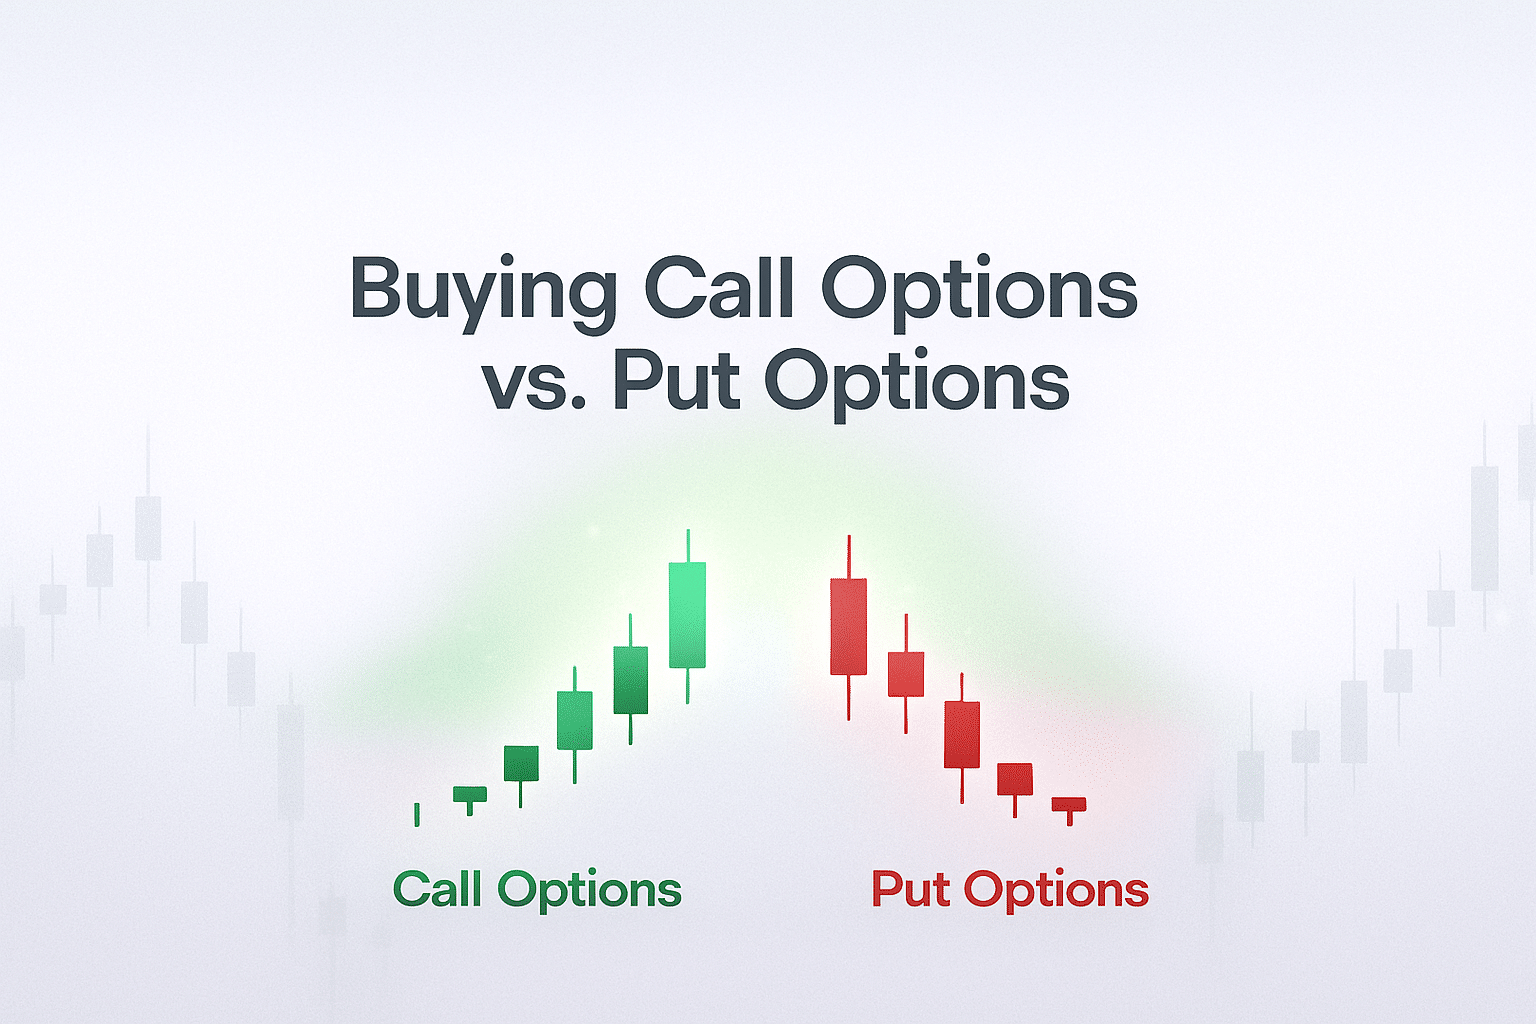
How To Choose The Right Options Strike: ITM vs OTM vs ATM
Strike selection determines how your options behave, what you’ll pay, and your probability of profit. For call options, in-the-money (ITM) strikes sit below the current stock price and act most like owning stock with higher cost but lower risk, at-the-money (ATM) strikes near the current price balance leverage and probability, while out-of-the-money (OTM) strikes above the current price offer maximum leverage but require larger moves to profit.
You know that feeling when you’re right about a stock’s direction but your options still lose money?
It happened to me early on – I’d buy cheap out-of-the-money calls, watch the stock move exactly as I predicted, then scratch my head as my contracts expired worthless. The problem wasn’t my market analysis. It was my strike selection.
Here’s the thing: choosing between an ITM vs ATM vs OTM options strike isn’t just about what you can afford. Each type behaves completely differently, even when trading the same stock. Understanding these differences – and knowing when to use each approach – can transform your options trading from frustrating guesswork into strategic positioning.
Let’s break down exactly how each strike type works and when you should use them.
Table of Contents
Understanding Your Three Option Strikes Option
Before you can choose the right strike, you need to understand what you’re actually buying with each option. Think of it like choosing between three different cars – they’ll all get you where you want to go, but they handle completely differently along the way.
In-the-Money (ITM) Option Strike:The Conservative Choice
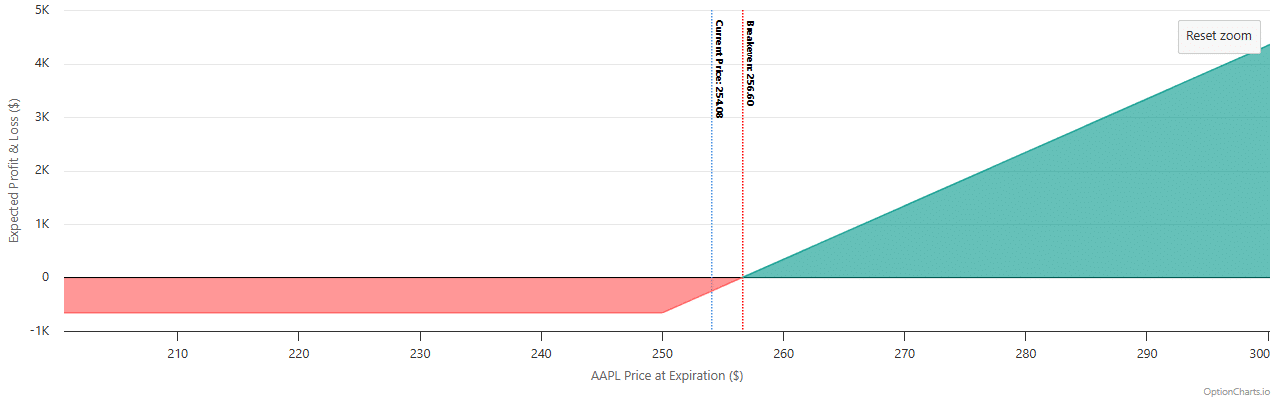
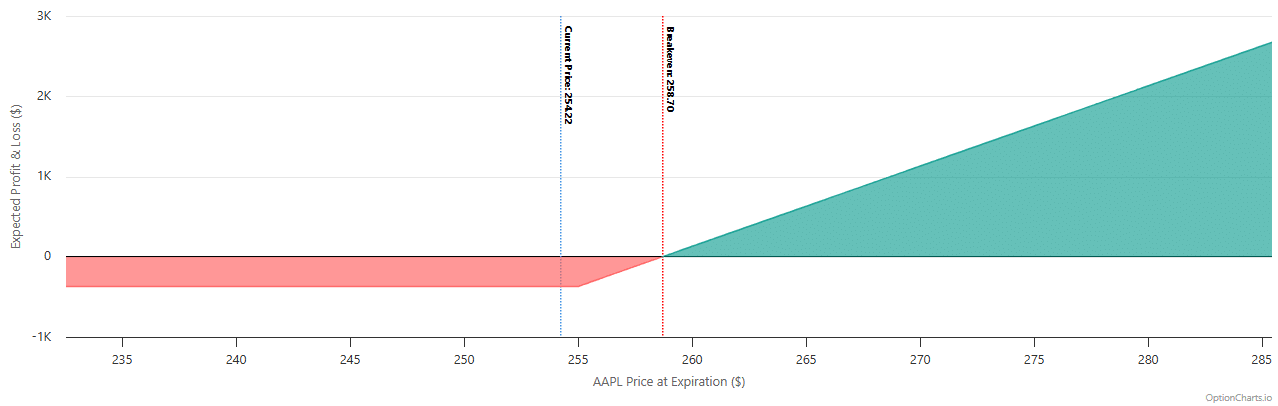
- What you’re buying: When Apple is trading at $254.08, buying a $250 call means you’re purchasing an option that’s already ~$4 “in-the-money.” You’re paying mostly for something that has real, immediate value; if the option expired today, it’d be worth at least $4.
- How it behaves: ITM calls act almost like owning stock. If AAPL moves up $1, your $250 call might move up $0.65. It’s predictable and steady – no wild swings.
- The trade-off: You’ll pay more upfront ($6.60 per contract), but you’re buying something with built-in value that won’t disappear overnight. Time decay hurts less because most of what you paid was for that $4 of real value.
- Best for: When you’re confident about direction and timing, want less stress from time decay, and have the capital to deploy.
At-the-Money (ATM) Options Strike: The Balanced Approach
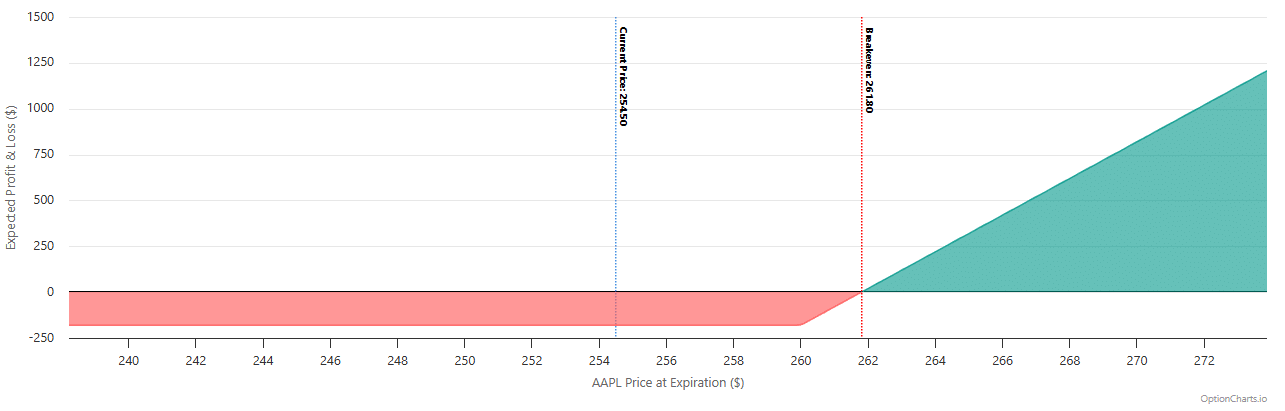
- What you’re buying: With Apple at $254, buying a $255 call means you’re right at the sweet spot. You’re paying for pure potential – no immediate value, but maximum sensitivity to stock movement.
- How it behaves: ATM calls give you the best of both worlds. If Apple moves up $1, your $255 call might move up $0.48. You get meaningful leverage without extreme risk.
- The trade-off: You’ll pay a moderate premium ($3.70 per contract) for balanced exposure. These strikes typically have the best liquidity, making it easier to get in and out of trades.
- Best for: When you expect meaningful moves but want to balance cost, leverage, and probability of success.
Out-of-the-Money (OTM) Options Strike: The High-Leverage Play
- What you’re buying: With Apple at $254, buying a $260 call means you’re betting on a big move. You’re paying purely for the chance (i.e., time) that Apple breaks through $260 and keeps running.
- How it behaves: OTM calls are the high-risk, high-reward choice. If Apple moves up $1, your $260 call might only move up $0.26. But if Apple ockets to $270, that same call would now be worth at least $10 (because they are $10 ITM)
- The trade-off: You’ll pay the least upfront (maybe $2 per contract), but Apple needs to move significantly just for you to break even. Time is your enemy – these decay fast as expiration approaches.
- Best for: When you expect explosive moves, want maximum leverage with limited capital, or are making speculative plays around events.
When to Use Each Options Strike Type
Choosing the right strike isn’t about picking what you can afford – it’s about matching your strategy to your expectations. Here’s a GammaEdge 4-step process for how to decide:
Ask yourself these four questions:
Step 1. How confident am I in both (price) direction AND timing?
- High confidence in both direction and timing → OTM calls for maximum leverage
- High confidence in direction, uncertain about timing → ITM calls for patience
- Medium confidence → ATM calls for balance
Step 2. How much time do I think this will take?
- Uncertain timing → ITM calls (less time decay pressure)
- Medium-term view → ATM calls
- Quick move expected → OTM calls work well
Step 3. How much capital can I allocate?
- Large capital → ITM calls for higher probability
- Medium capital → ATM calls for balance
- Small capital → OTM calls for maximum exposure
Step 4. What’s my risk tolerance?
- Low risk tolerance → ITM calls
- Medium risk tolerance → ATM calls
- High risk tolerance → OTM calls
The key insight: If you’re extremely confident about both direction and timing, OTM calls maximize your returns. But if you’re mainly confident about direction, ITM calls give you more room for error on timing since they retain intrinsic value even if the move takes longer than expected.
GammaEdge quick decision framework: Start with your conviction on timing, then adjust based on your capital and risk tolerance. When in doubt, ATM calls offer the best balance for most directional trades.
Now let’s see how this decision framework plays out in practice with a real trade setup, enhanced by the GammaEdge options market structure analysis.
Real-World Example: Three Ways to Trade Palantir
Before we dive into the trades, let’s set the context. In order to understand if we want to be looking for bullish or bearish trades, we have a specific framework that we walk through predicated on the GammaEdge options market structure analysis framework. These are the three key elements of it:
Element 1 – SPX Analysis: Is the SPX complex call-dominated or put-dominated? When looking for bullish setups, we want to see the SPX be in an overall call dominated structure.
- Element 2 – Transition Zone Analysis: Is the SPX trading above or below key structural levels? Specific to our transition zone, this is a key region of the options structure where choppy price action resides. However, a break above this zone, and we expect to see bullish continuation higher.
- Element 3 – Market Trend Model: Is momentum under the hood of the market (as measured by the TICK Index), bullish or bearish? In a bullish regime, we see momentum trending higher on both a short-term and longer-term time frame.
For the sake of this example, we’re going to assume that the GammaEdge Framework is telling us that it’s a bullish environment. Therefore, we’re going to be going through a long call example.
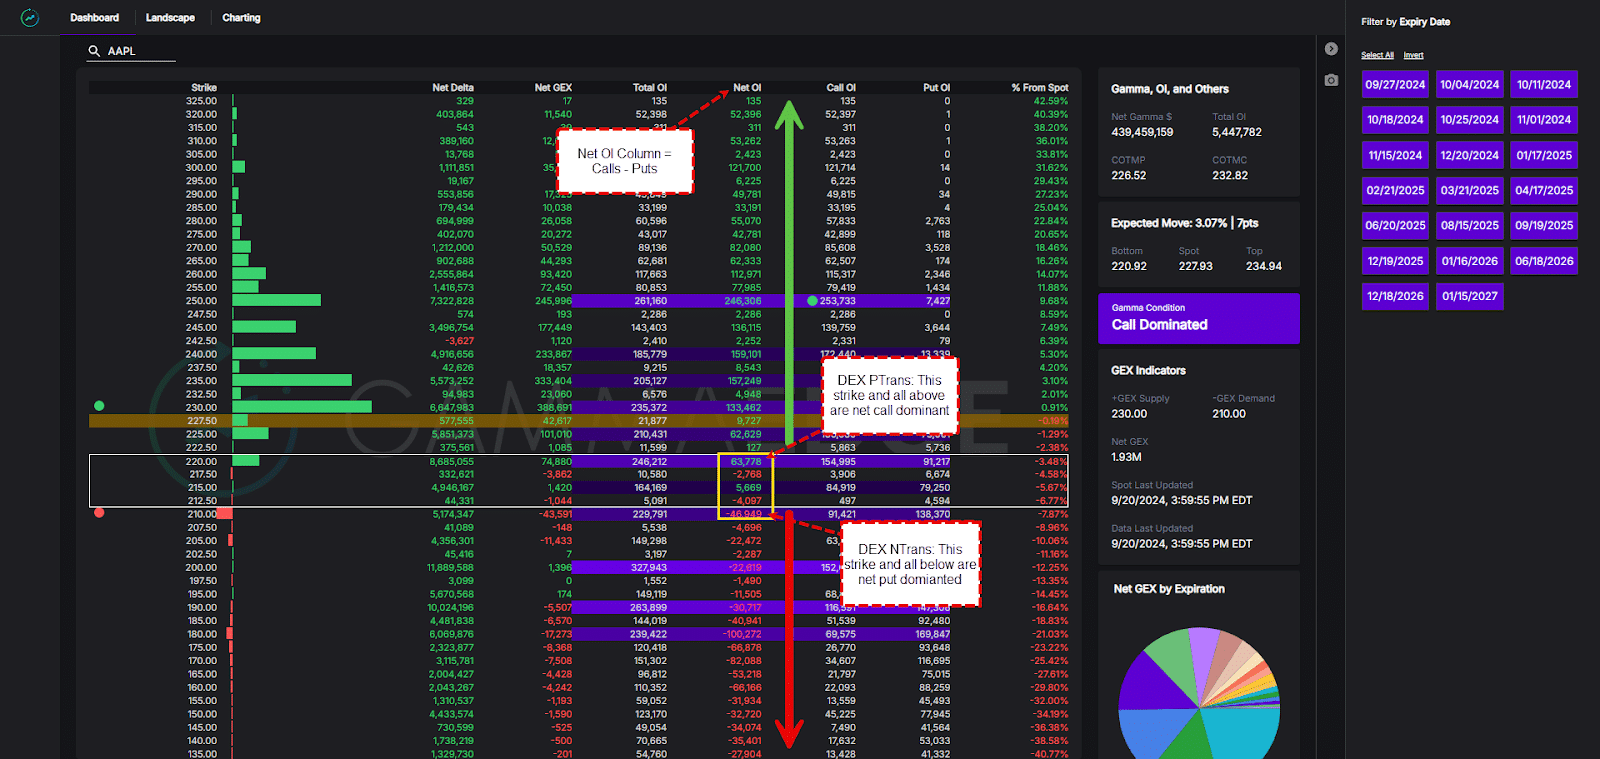
The Setup: Palantir (PLTR) is currently trading at $182.50. Using GammaEdge’s Web App Dashboard, which provides us with a visual of positioning within PLTR’s options structure, here’s what it shows us:
- Spot Price: $182.50
- Top of Transition Zone: $180 (which spot is above, so bullish)
- +GEX Level: $190 (profit target #1; where max short-term speculation is centered)
- COI: $200 profit target #2; where the largest collective upside positioning is concentrated)
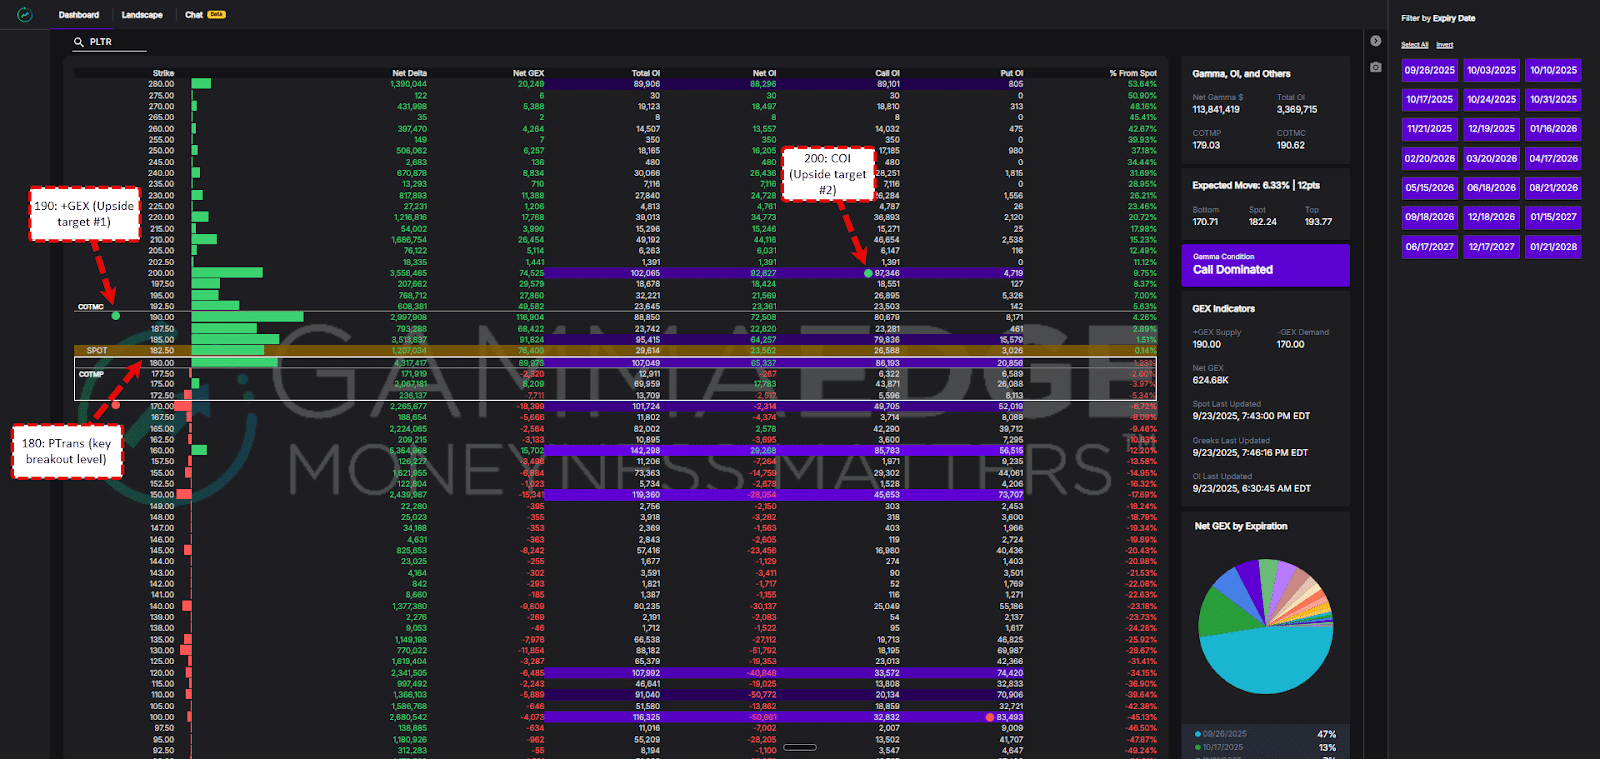
With PLTR already above the transition zone and structural support pointing toward higher levels, here’s how three different traders might approach this bullish setup:
The Conservative Approach: ITM Options Strike $175 Calls
The trade: Buy $175 calls with PLTR at $182.50 Cost: Approximately $12 per contract What you’re buying: $7.50 of intrinsic value + $4.50 of time value Delta: ~0.65 (moves $0.65 for every $1 PLTR moves)
Potential outcomes:
- If PLTR hits the +GEX target at $190: Calls worth ~$19 (58% gain)
- If PLTR reaches COI at $200: Calls worth ~$29 (142% gain)
- If PLTR drops back to $180: Calls still worth ~$9 (25% loss)
The Balanced Approach: ATM Options Strike $182.50 Calls
The trade: Buy $182.50 calls with PLTR at $182.50 Cost: Approximately $7 per contract
What you’re buying: Pure time value with maximum gamma exposure Delta: ~0.50 (moves $0.50 for every $1 PLTR moves)
Potential outcomes:
- If PLTR hits +GEX at $190: Calls worth ~$12 (71% gain)
- If PLTR reaches COI at $200: Calls worth ~$22 (214% gain)
- If PLTR drops back to $180: Calls worth ~$3 (57% loss)
The Aggressive Approach: OTM Options Strike $190 Calls
The trade: Buy $190 calls targeting the +GEX level Cost: Approximately $3 per contract What you’re buying: Pure time value with maximum leverage potential
Delta: ~0.25 (moves $0.25 for every $1 PLTR moves initially)
Potential outcomes:
- If PLTR hits the +GEX target at $190: Calls worth ~$7 (133% gain)
- If PLTR reaches COI at $200: Calls worth ~$17 (467% gain)
- If PLTR stays below $190: Calls expire worthless (100% loss)
Advanced Application: Using GammaEdge 4-Step Approach for Options Strike Selection
Now that you understand the basics of ITM, ATM, and OTM calls, here’s how GammaEdge options market structure analysis can enhance your strike selection beyond traditional approaches.
Most traders use a traditional method where they pick strikes based on what they can afford or arbitrary technical levels. But when using the GammaEdge method, you can see actual options positioning and structural levels, your strike selection becomes far more strategic.
The GammaEdge Options Strike Selection Framework:
Step 1: Identify Structural Support Look for strikes that align with key structural levels like our:
- Transition zones (areas of chop where we expect to see price acceleration once broken to the upside or downside)
- +GEX levels, or
- significant pocket of speculator concentration (like COI)
These aren’t random price points – they’re where actual market forces create support or resistance.
Step 2: Match Strikes to Market Environment In strong call-dominated environments, slightly OTM strikes often perform best as they benefit from both gamma acceleration and structural momentum. In mixed or uncertain environments, ATM strikes provide better balance.
Step 3: Consider Time Decay vs. Structural Levels ITM strikes make more sense when structural targets are far from current price (giving you time for the thesis to develop). OTM strikes work better when structural targets align closely with your strike prices.
Step 4: Monitor Positioning Changes Use tools like the GEX Ratio and Delta Balance to track whether call speculation is building or fading. Increasing call speculation supports OTM strikes, while decreasing speculation favors more conservative ITM approaches (or avoiding the trade altogether).
The Key Advantage: Instead of hoping your strike selection works based on chart patterns alone, you’re aligning with actual money flows and structural forces that influence option pricing.
This transforms strike selection from guesswork into strategic positioning based on where the market is actually positioned to move.
The GammaEdge Options Strike Selection Action Plan
Here’s how to implement everything we’ve covered:
Before Your Next Options Trade:
- Run Through the GammaEdge Decision Framework: Ask yourself those four key questions:
- How confident am I in direction and timing?
- How much time do I have?
- What’s my capital situation?
- What’s my risk tolerance?
Let your answers guide your strike choice, not just what’s cheapest.
- Check the Structural Picture: Don’t trade options in a vacuum. Use tools like GammaEdge’s options market structure analysis framework to see where significant positioning sits and which strikes have structural backing. Your $280 calls have better odds when $280 is actually a meaningful level in the options market (and not just a random spot on a chart).
- Match Your Strategy to Your Thesis: If you’re expecting a quick, explosive move, OTM calls make sense. If you believe in the direction but aren’t sure about timing, ITM calls give you more room for error. Most directional trades fall somewhere in the middle – that’s where ATM calls shine.
- Start Small and Learn: Practice with paper trading or small position sizes until you get comfortable with how each strike type behaves. There’s no substitute for watching your ITM, ATM, and OTM positions react differently to the same stock movement.
Key Takeaway: Strike selection isn’t about finding the “perfect” option – it’s about matching your choice to your specific thesis and market conditions. Master this alignment, and your options trading becomes far more predictable and profitable.
The Bottom Line: From Guesswork to Strategic Options Strike Selection
Strike selection doesn’t have to be complicated, but it shouldn’t be random either.
The difference between consistently profitable options trading and expensive lessons comes down to alignment – matching your strike choice to your conviction level, timeframe, and what the market structure is actually telling you.
Remember the key insights:
- ITM options strike calls are your steady performers – more predictable, less vulnerable to time decay, but requiring more capital for meaningful exposure.
- ATM options strike calls offer the sweet spot – balanced leverage with reasonable probability, plus the best liquidity for most traders.
- OTM options strike calls deliver explosive potential when you nail both direction and timing, but they’re unforgiving if either element goes wrong.
The GammaEdge Advantage: When you can see where actual money is positioned and which levels have structural significance, you’re not just picking options strikes based on affordability or chart drawings. You’re aligning with forces that actually drive option prices.
Stop treating options strike selection like a guessing game. Start matching your choices to your thesis, your timeframe, and what market structure reveals about where the real opportunities lie.
Your options trading will never be the same.
Next Steps: This way of thinking, that is GammaEdge’s Options Market Structure Analysis, may be new for you. That’s exactly why we created our flagship educational course called the GammaEdge FastPass, which is designed to significantly accelerate your learning curve. As with all of our education, it’s completely free to you and gives you everything a paid member of our community gets. That includes our methodologies, our strategies, frameworks, etc. We hold nothing back. You can unlock your copy of the FastPass using the link below: